This page describes some of the wrecks dived by Totnes Scuba Club. Information was compiled by club members.
The Maine
This is a very popular wreck. The Maine was torpedoed on March 23rd 1917 by the U boat UC-17. Despite a determined rescue operation, she sank “gracefully, upright and on an even keel” just offshore from Soar Mill Cove. For a while her 2 masts emerged 12 ft above the waves, but she is now a good exercise in wreck location. The wreck lies at 50.12.750 – 03.50.960 at a depth of around 35m, upright on an even keel and about 15m above the sea bed. The Maine is a big boat – just under 400 ft long with a beam of 46 ft.
The Maine was “discovered” by Torbay BSAC in 1961. They own the wreck having paid 100 pounds for her. The club salvaged the bronze propeller, and in 1983 they brought up the spare iron propeller off her deck which is now displayed in a shopping centre in Paignton.
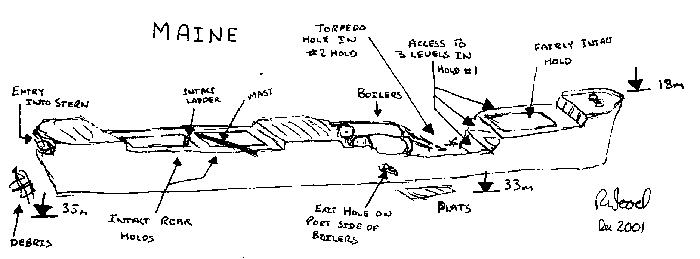
The Maine from the stern (Image: Richard Wood)
Fierce tidal streams mean that diving the Maine requires good preparation. Slack water lasts about 40 minutes either 3 hrs before or after high tide. Diving outside these times is usually a frustrating experience as the currents tend to force you to a boring drift dive across a fairly featureless sea bed.
The stern of the Maine is beginning to collapse, some of the debris is now lying on the seabed at 35m. The propellor was salvaged some time ago, and this was probably the cause of the damage here. If the diver swims “up” the stern, there is now a hole which allows entry into the rear of the ship. The 4.7 inch gun was also recovered.
The diver can take two paths here. One is on the deck, the diver drops from the poop deck to the main deck, and passes over or past the open hold hatches. This rear part of the ship is in a good state, with no major structural collapse. The rear mast can now be seen lying across the corner of one of these holds and to starboard. The diver then swims up over the superstructure area, and then drops down again to face the two main boilers.
The other route is through the rear holds and under the superstructure (the route is shown in the following plan).
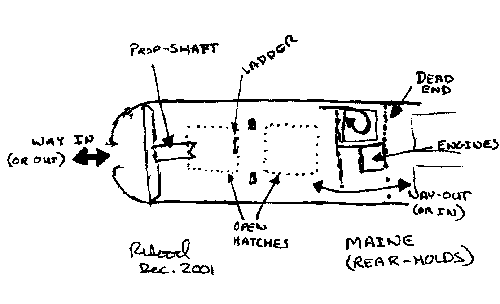
Maine rear hold plan (Image: Richard Wood)
The diver can enter the wreck through an obvious hole in the stern, passing inside and down into the rear-most hold. At this rear-most region of the hold, the prop-shaft can be seen in the centre of the ship. The “floor” of these rear holds is covered with the ship’s chalk cargo (that is what the rounded white “pebbles” that cover the ground here are) and there is a ladder passing up out of the hold. Through these two rear holds there is plenty of light (the decks have rotted) and there is easy exit up and out through the hatches. Moving forward from the rear holds there are two options, and it must be noted that through these next parts there is not the same amount of light or overhead exits, and there is more silt in them than in the holds. One route on the port side is pretty much a dead end, but a hole at the bottom left allows entry into a room. The diver can swim around this dark little room, but must go back out through the same hole – the girders seem too close together at the forward end to allow further travel. The other exit is between the girders at the starboard side, also at the bottom. The diver then swims through into another darkened room, but this time you can swim past the engines and exit through the next set of girders. The diver will now be facing the two main boilers and is no longer inside enclosed spaces.
NOTE: This interior route is not a tight squeeze at any time, even a fat diver with twin-15’s can fit through these holes.
To the starboard side of the boilers the diver can swim down and out of the wreck through a hole in the side, and will then be on the shell and sand seabed where there are collapsed plates. Alternatively, the diver can swim over, between (which is possible) or to starboard of the boilers to descend into the shattered remains of number two hold. It is on the starboard side of this hold that the torpedo hit, and the damage is easy to see. There is no starboard side to the ship here, the hull having collapsed to seabed level. On the port side, the hull is reduced, but still present. Swimming forward, it is obvious that, in complete contrast to the second hold, number one hold is intact, and the hatch is off. The diver can swim around this hold at three different levels (decks). Forward of this hold, the intact foc’sle and bow stands up, and is the highest point of the wreck. ”
Richard Wood – May 2003
Read Divernet’s article.
This report from the Maritime Archaeology Trust from 2018 provides more details.
The Louis Shied
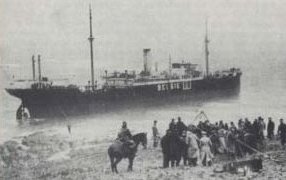
The Loius Shied
The Louis Sheid was a Belgian steamer whose wrecking was the result of a rescue operation in mid channel. In December 1939 the freighter Tajandoen was either torpedoed by Prien (who had dispatched the Royal Oak at Scapa Flow) or mined. The Louis Sheid helped to rescue the survivors, but being a neutral ship in enemy waters the captain made for land in earnest. Heavy rain, a southerly gale and few shore lights meant that they couldn’t see the rocks as the boat hurtled into the South Devon coast just by Thurlestone. All her crew plus the survivors from the Tajandoen were rescued by a combination of lifeboats and shore based rocket rescue apparatus. Despite attempts to refloat the Louis Sheid she was wedged well into the rocks. Some salvage took place, and after fierce gales the boat split into two. Over the following years a lot of salvage took place with even an aerial ropeway contructed from the cliffs onto the wreck so as to take metal away.
The Louis Sheid was big – 420ft long with a beam of 55 ft. She lies at 50:15:48; 03:52:12 just off the Leas Foot beach at Thurlestone. The main part of the wreck is the stern section. The bows lie embedded in sand some way off the main wreck.
The Sheid is a good shore dive. The wreck can be dived at any state of the tide, but south westerlies will blow the site right out. She can be dived from Leas Foot beach which means parking in Thurlestone golf club and then walking a short distance to the sandy beach, or alternatively she can be dived from South Milton sands, on the other side of the headland. The latter is probably easier now, parking on the headland, walking down to the beach and heading directly west. Until 2007, the wreck was easily located by a stempost that emerged above the waves at low water. Alas no more, so locating the wreck while swimming in the water can be challenging. Once found, the wreck is really superb. She lies upright in 10m of water and is well broken but the main lines of the boat can be pieced together. The boilers are well preserved, as is the rudder and part of the stern section. The wreck supports a good population of wrasse, pollack and much other sea life. In the day time the wreck is colourful, while at night a different atmosphere and a multitude of life presides.
The Louis Sheid is an excellent night dive, and if dived at a full moon with good visibility is unforgettable
Video: Diving the Louis Sheid
The Bretagne
This can be an excellent dive – especially when the vis is good. The Bretagne was a schooner-rigged steamer that collided with a French steamer some miles off Torbay in August 1918. Conditions were foggy so that the collision was unexpected and severe for both boats. Unfortunately, the First Mate perished with the Bretagne.
The wreck lies upright at 50:29:490 – 03:22:698 – a few miles east of Torbay. She lies in 30m of water and it is 23m to her decks. There is a lot to see on the wreck. Her deck and holds are quite well preserved as are some of her deck handrails. The diver can descend down by her stern and forage around the prop shaft around which there is a bit of a silty scour. The wreck has a lot of atmosphere. Like most wrecks, diving the Bretagne is best done during slack water, but diving is quite possible at most states of the tide. The biggest problem is visibility. The Bretagne can be a darkish wreck to dive.
Bristol Aerospace BSAC own the wreck. More information is available from their web site or from this Divernet article.
The Herzogin Cecile
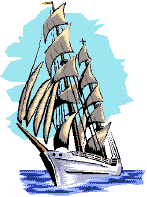
Herzogin Cecile
The Herzogin Cecile was a beautiful Clipper ship. A Tea Clipper that hurled across the world as she delivered goods from Australia to Britain in under 90 days. She took part in the Australian Grain Races – and she won 8 of them. She was a four masted barque built in 1902 as a school ship for the North German Lloyd Line. She was a little over 3000 tons, 320+ ft long with a beam a little under 50 ft. Her sails were impressive. When all were spread there was over an acre of canvas that propelled her along. She only just missed the world record at 21 knots.
In 1936 she sailed from Port Lincoln, Australia to Falmouth in just 86 days – her fastest ever. She then pushed forward up the English Channel. Rough seas and fog were her nemesis. Close to Salcombe she hit the Hamstone. A lifeboat arrived and together with cliff launched breeches buoys managed to rescue all the crew and passengers. The problem was the cargo of grain. It began to rot and apparently the smell was appalling. The decks began to split under the strain of the swollen grain. Much of the grain was removed by salvage operations and it was then agreed to tow the boat into Salcombe out of reach of strong seas. However, the Salcombe authorities were nervous about the health threat of the rotting cargo so the ship was beached in Starehole Bay just outside Salcombe. Most of the remaining grain was washed out and eaten by seagulls. However, Starehole Bay was not a safe harbour. The Cecilie rested on a slight sandy bottom with a firm rocky base. In July 1936 a strong south easterly gale finished the boat. The sandy bottom was uprooted and the ship settled onto the unforgiving rock. Her back was broken and after a few more gales the boat sank below the waves.
Today, the Herzogin is a nice wreck dive at 50:12:49; 03:47:01. She is well broken up and it is virtually impossible to picture the original graceful ship from the tangle of plates and tubes that the diver encounters. Part of the problem is the depth. It is difficult to reach 10m on this shallow site and so she is well broken by the south easterly gales that hurl into the bay. Another problem is the sand which liberally covers much of the wreck. However, enough of the ship remains to make this dive quite special – especially if the vis is good.
The bow is still recognisable. The anchor hole can still be seen. But best of all this wreck is really pretty. The light twinkles through the plates. There are swarms of fish that tamely look at the inquisitive diver. The maze of plates and wreckage challenges the diver’s orientation. There are some splendid iron tunnels within which the diver can swim through with attendant wrasse. You can still see wooden decking and a few of the great iron pulleys that hoisted the large sails that propelled the Herzogin to world record speeds. There is much to see.
The Herzogin is a reasonable second dive.
James Eagan Layne
The Eagan Layne is a well known wreck. Many people have dived her over the last 35 years so that she is now virtually a diver’s national monument! This is largely because she lies upright on the sea bed at little more than 22 metres to the bottom. She is easily accessed by dive boats from Plymouth and is usually no problem to find owing to the dive boats that congregate over her. If, however, your boat is the first to arrive then a large marker buoy moored permanently near her makes location a fairly easy matter.
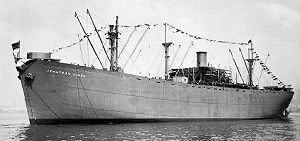
Liberty Ship
The Eagan Layne was an American Liberty ship charged with the task of relaying supplies to Britain during World War 2. Hundreds of these ships were built in the early 1940’s and they transported many men and supplies from America to Britain. They were built rapidly and followed a rather ugly prefabricated design. No awards were won for their elegance. But they did the job, and Britain’s war effort benefited immensely from their contribution. The Layne was built in December 1944 and by March 1945 she was engaged in convoying US Army engineering stores, motor boats and timber from Barry in South Wales to Ghent. As she passed near to Plymouth she was torpedoed by a German U boat (U-1195) between holds 4 and 5 on the starboard side. Her steering gear failed and she began to flood. She was taken in tow to shallower water in Whitsand Bay where she gently sank upright on a sandy bottom. There were no casualties and much of her cargo was salvaged.
For many years the wreck was easy to find since one of her masts remained above the surface until the late 1970’s. She was in an excellent condition and apparently the torpedo damage was easy to see. She is at 50:19:32; 04:04:42 (DMS). She is 440 ft long and was over 7000 tons gross weight. She lies in 22 metres with about 11 metres to her deck. The stern section of the wreck is separate from the main hull and lies about 25 m to the south.
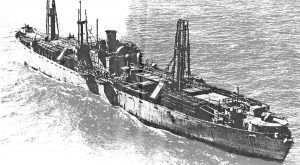
Liberty Ship: The John C Calhoun
Although the Layne is deteriorating she is an excellent dive. Usually, the diver will land on the deck and navigate over to the guard-rails. Peering over, one is confronted with a nice drop off’ down to the sea bed. The sides of the Layne are covered with white dead man’s fingers. The bows are intact and to swim around them on the sea bed and peer upwards at the curve is memorable. Shoals of pollack and pouting congregate around the wreckage and there is much to examine on the sea bed. Inside the wreck, the holds are very accessible although there is now a risk of falling metal. In the summer the holds are full of fish. Each hold seems to contain a different set of fish. There are masses of wreckage and fitments strewn around. The engine room, pistons and boilers are very obvious and there are still a couple of bits of brass to be found. Don’t forget the stern section which is separated from the main wreck by about 50m to the south westish. There may be a line from the midsection that takes you there – otherwise follow the curving line of the prop shaft. It is possible to dive the wreck by descending down the bows, going through the holds, turning off to the stern by the midships port break, swim around the stern and returning to the bows by the same way.
The Eagan Layne is a superb night dive – it is very quiet when you are down below the engine room in the dark.
Read Divernet’s article.
The Persier
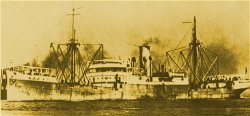
The Persier
Another famous South Devon wreck which receives many visits from divers. Unlike the Maine and James Eagan Layne this wreck is fairly well broken and almost flattened against the sea bed in places. However, she is an excellent dive not least because of the many fish that swarm around and over her.
The Persier was a 5000 ton British built merchantman. She was built in Newcastle in 1919 and was sold to Belgium shortly after. She traded all over the world, and even took part at Dunkirk in 1940. She nearly sank while doing convoy duty from America to Britain in 1941. She remainded stranded off Iceland for over a year until she was towed back to Britain to be repaired. In 1945 she set off from Cardiff on convoy duty. Off Eddystone she met her nemesis from a couple of torpedoes from UB-1017. Confusion reigned as lifeboats were launched only to be shattered by her propellor. People were spilt out over the heavy Force 7 seas. Support vessels managed to rescue the crew and passengers. The Persier carried on alone drifting into the night. She sank but no one knew where.
In 1969, a fisherman found the wreck in Bigbury Bay. Divers from Plymouth Sound went down and brought up the ship’s bell. They bought the wreck for 300 pounds and still own her.
The Persier is at 50:17:06; 03:58:07 (DMS) at a maximum depth of around 30m. Diving can be done at much any time – there is little tidal flow around her. She lies on a sandy-rocky bottom with extensive and interesting reefs around her. Her bows and stern are fairly recognisable, but the midships is a mess of plates and wreckage (in the 70’s the Persier was an upright wreck not unlike the Maine today). She lies roughly in a NE-SW orientation with her bows pointing southwards. The bow is quite upright and stands some 10m above the sea bed. Three large boilers can be seen. The remains of the engine with large pistons scattered over the wrecked plates are easily found. There is an excellent swim through part of the prop shaft chamber which leads straight to the rudder which lies over a reef. Underneath the stern there is a pretty fish filled chamber and just outside lie the remains of the steering gear plus an odd shaped upright metal pyramid that was a gun mount.
Best of all are the fish. This is the place to observe myriads of fish – some hunting others. Bib and pollack are especially common. The visibility and water quality is usually quite good, and some divers reckon this to be one of the best wrecks in South Devon.
There is a lot to explore but given the depth she needs a few dives before the diver can properly appreciate her and navigate around.
Read Divernet’s article.
Video: Stern section of the Persier
Video: The boilers and bow section
The Riversdale
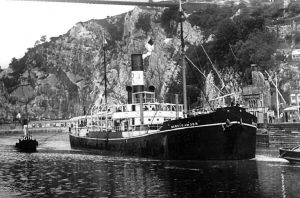
The Marstonmoor (Image: Steve Clarkson)
There are a lot of South Devon wrecks caused by U boat attack in 1917. The Riversdale’s end came at the end of the year during the night of December 18th. The armed merchant steamer was going from Tyneside to Savona. Her route took her past Start Point and this is where UB 31 picked her off. A single torpedo hit her, but fortunately for most of the crew the ship was run aground off Prawle Point. She was patched up and optimistically towed off. She didn’t get very far. Within a mile her patch blew off and the Riversdale gently sank in over 40m of water.
The photograph above is of the steamship “Marstonmoor” which is very similar to the Riversdale and built by the same company
She lies upright on a light sandy bottom in an E – W axis. Her position is at 50:11:777 – 03:44:143 slightly SW off Prawle Point. You need to dive at slack water otherwise you’ll suffer strong currents. It is 35m to her decks and over 45m to the sea bed. The Riversdale is a large wreck – over 300 ft long. In some ways she resembles the Maine. Her decks have largely caved in, but she is a very intact and recognisable wreck. She has large holds that can be swum into, although care needs to be taken. A great iron propellor dominates the stern section and there are large quantities of coal strewn around and inside the wreck. In 2002 a monofilament net was strewn across holds 3 and 4 on the port side. Good dive planning is essential for this dive.
Torbay BSAC first dived the wreck and own her.
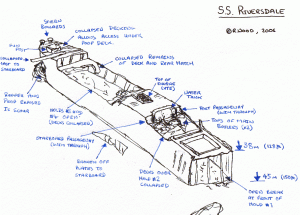
The Riversdale (Image: Richard Wood)
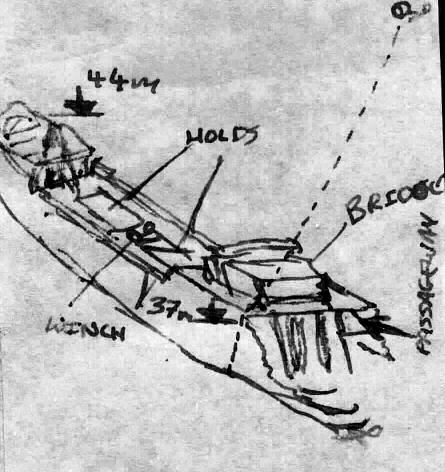
“The Riversdale lies upright on a sand and shell seabed at 47m (160ft) with her stern to the SW (approximately). It is about 38m (130ft) to the decks. The wreck from the stern;
There are bollards at the very stern, and a gun mount (post and gun are gone) that is beginning to collapse into the deck – so lies at an angle. To the port side of the gun mount there is a hole in the collapsing deck which allows entry inside the stern. At the forward part of the stern castle the mast has collapsed to starboard and hangs out at 90 degrees over the side of the wreck. Descending to the holds it is apparent that the decks (apart form a very small section between the stern castle and number 4 hold on the port side) has disappeared – reputedly the work of commercial coal salvage activities. Following these mostly empty holds forward you come to the superstructure, which, although tangled and twisted on the port side, still allows a “swim through” inside its starboard side. Outside the wreck at this point (to starboard at least) there are a number of plates on the seabed. Forward of the superstrcture there is an exposed donkey boiler lying across the ship. The deck around number 2 hold is missing, and the hold largely empty, but the deck over number 1 hold is intact and that hold’s hatches are off. The wreck ends abruptly at the forward end of number one hold. The entire bow and foc’sle lies on its side a short distance to the NE (to starboard of straight ahead).”
Richard Wood – Oct 2000
The Elk

The Elk: The wreck is more flattened and elongated than this sketch suggests (Image: Richard Wood)
The Elk is a small trawler of 108 ft length that was mined in November 1940 just outside Plymouth Sound. For most of her life she was a fishing vessel. She was built at Hull in 1902 and until the 1st World War fished from Grimsby. In 1915 she was requisitioned as a minelayer and saw service off the Dardanelles. During the interwar period she worked off West Wales from Milford Haven, but in 1939 she became a danlayer.
The Elk was discovered in 1981. She lies upright beside the Elk Reef at 50:18:427 – 04:10:314 (DMS) at a depth of 32m on a sandy bottom. The wreck lies approximately N-S with bows to the north. For a few years she was in a good state of order. Being small, she could be easily dived and her cabin was a notably intact feature. Unfortunately, she has suffered much over the last few years and is now a sad reflection of her original pristine self. Her brass has largely gone as has much else. However, the diver can easily swim around the entire wreck and appreciate what a whole wreck is like.
The Elk is a very popular dive. Much fish life, a large conger and other things to see including artillery shells and other naval debris.
The surrounding reef is excellent. Head SW from port side of the wreck and after 5 mins over the sand the reef appears. Some nice small drop offs. Top of the reef about 20m.
When diving on the Elk you should be aware that the wreck lies less than 200 metres outside the limits of the Dockyard port of Plymouth. It is also at the end or beginning (170/250 degrees leg) of the Western Deep Water Channel with the result that large warships, auxiliaries and ferries pass almost directly over the dive site. Though not a legal requirement, it is strongly recommended that those wishing to dive on the Elk inform Longroom Port Control on VHF Ch 14 or 01752 663225 to receive a movements sitrep. Be aware that programmes can change at short notice and so supervisors should keep a good visual lookout and listening watch on VHF Ch 14/16. If you should have concerns regarding a vessel’s movements call the ship on VHF Ch 14 or Longroom Port Control. Be aware that from the perspective of a large ship, with concerns for navigational safety, a RIB with a Flag “Alfa” may not be seen until at short range and marker buoys even closer.
Elk
Video: Diving the Elk
The Newholm

Transits for the Newholm (Image: Richard Wood)
This wreck needs good dive planning. She lies in a strong tidal stream about 1 mile south off Start point. The Newholm was a 3400 ton steamer that was mined on her way back to Middlesborough in September 1917. Most of her crew perished in the explosion.
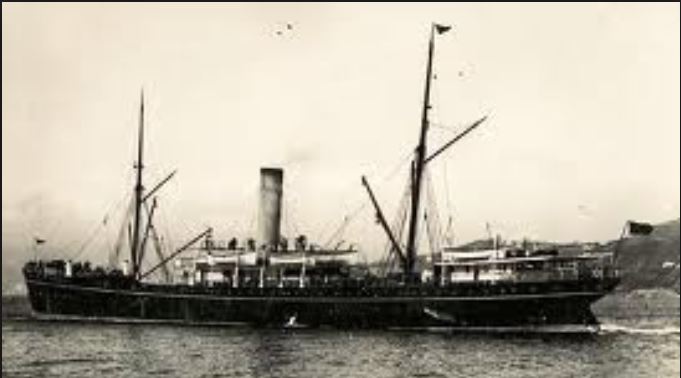
The SS Elingamite – an almost identical ship built by same builders (Image: Steve Clarkson)
The Newholm lies at 50:12:577 – 03:38:530. She lies on a sandbank with her stern pointing northwards towards the shore. Her decks are well bedded in with the sandbank with a starboard list of about 35 degrees. Her back is broken and there are a number of breaks in her hull which allow divers to penetrate part of the wreck. There are a number of holds some of which still contain the iron ore that the steamer was carrying. A couple of masts still stand a couple of metres proud. It is about 28m to her stern rail, but around 35m to the more interesting parts of the wreck. With the sand scours around the bows and stern it is possible to reach 40m plus.
It is worth diving below the stern rail to look at the rudder (twisted hard to the port) and parts of the propellor that appear above the sand. If the sand allows there is a swimthrough just in front of the rudder. Depth around 41m.
The bottom is light and owing to the heavy currents is a well swept site. The sand banks up in different places at various times. The wreck is firmly embedded in the sand but is still a good dive with lots to see. It acts as a magnet for wrasse and pouting that congregate around the wreck.
The Newholm lies in a strong tidal stream. It is best dived at slack on neap tides. Experienced divers only. Phosphorus blocks have been reported on this wreck. Looks like purple / orange glass with no growth on it. Best left well alone!
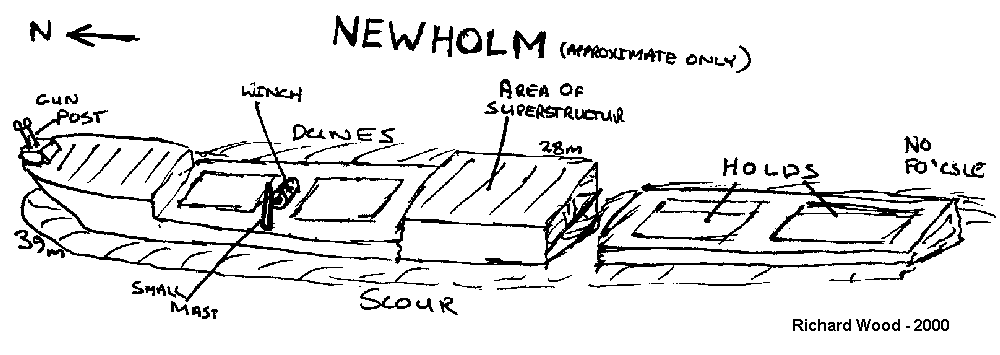
The Newholm (Image: Richard Wood)
“The Newholm lies upright, with a 30 degree (estimate) list to starboard. The wreck lies approximately north-south with its stern to the north. Under the stern is a scour to about 39m. Sand is “drifted up against the (higher) port side, in places level with the decks. At the shallowest, the port side deck rails are in about 28m. The is a scour at the starboard (lower) side. The ship has broken her back over a sand bank, with a deeper sections at each end, the most interesting parts of the wreck are accessible as a 36m dive. Traveling from the stern notable features are:
The counter stern has a gun post – complete with pivot – but no gun. There is a stern “castle” which can be easily entered, but there is some rope netting in there. You then pass number 4 hold which is open and filled with sand (all 4 holds are open – the hatches are off). Between 4 and 3 holds is a large winch type machine, and some masts are sticking up about 3m on the starboard side. Number 3 hold is also mostly filled with sand. You then reach the midships superstructure area. From here the wreck can be penetrated down the port side. The machinery and boilers are buried. At the bow end of the superstructure region there is a total break with a gap of about 5m between sections of the wreck. At this point three decks of the superstructure block are accessible looking to the stern at the port side. Continuing forward, you can again penetrate down the port side into number 2 and 1 holds – which still contain some iron ore sticking out of the sand. At the forward end of number one hold there is a total break with nothing but sand visible, the entire fo’csle is absent (reputedly in 44m somewhere).
NOTE: It should be noted that the sand around the Newholm shifts from year to year, so that the amount of this wreck above the sand will change. Reports from the 1960’s quote a similar amount of wreck visible as today, but some reports from the 1980s say that the entire stern and poop-deck were submerged in the sand. ”
Richard Wood – Oct 2000
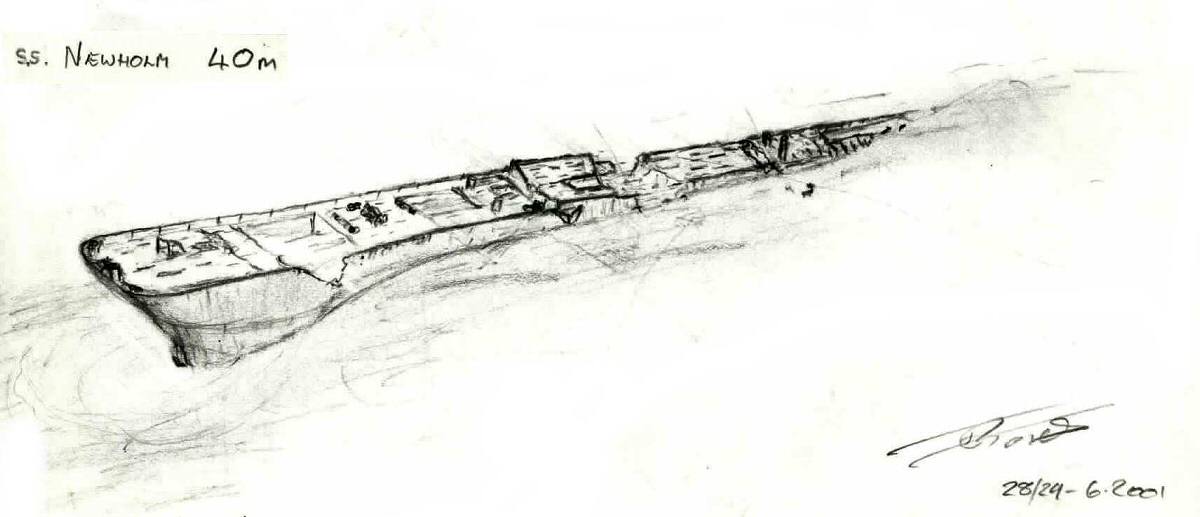
The Newholm (Image: Frederick Tones)
Video: Diving the Newholm – Part 1
Video: Diving the Newholm – Part 2
More info about the Newholm
Lord Stewart
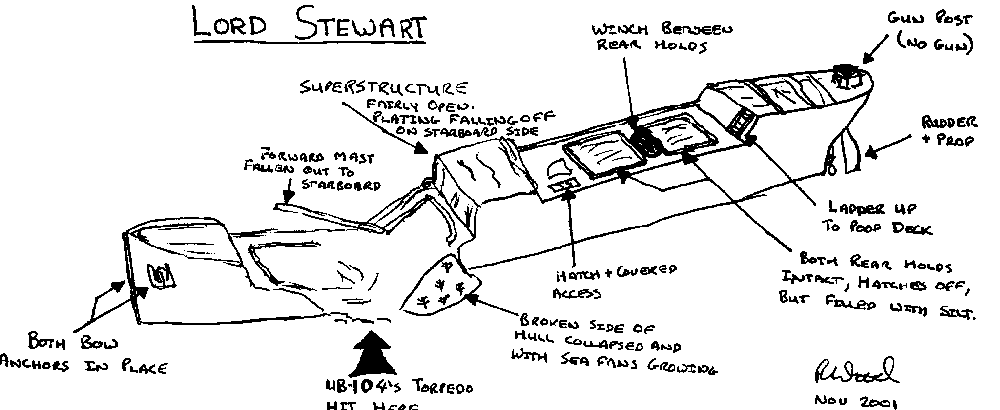
The Lord Stewart lies offshore from Watcombe between Teignmouth and Torquay. She was an armed merchantman of 250ft length that was torpedoed in September 1918. She was on her way from Cherbourg to Barry. One crewman perished in the explosion.
She can be found at 50:29:35; 03:16:55 (DMS). She is upright on a dark bottom at 37m. The wreck is 9m high and there is lots to see although the wreck is usually quite dark. Visibility is not superb.
The Lord Stewart was torpedoed in 1918 while (and in spite of being) well escorted. Her killer was UB-104, and while this U-boat may be unfamiliar to Devon’s divers, her commander certainly isn’t, many of the Salcombe and Dartmouth wrecks are courtesy of Oberleutnant Bieber (in his previous boat – UB-31).
The Lord Stewart lies upright on a fairly muddy seabed at 37m, it is about 25-28m to the highest parts around the superstructure or gun post, and about 31-33m to the decks. Viz is often better than on her closest neighbours, but that isn’t saying much! CAUTION – there is often a lot of fishing line about, draped around most the high parts of the wreck.
Swimming over the stern the rudders can be seen – this wreck has not sunk into the silt very far. Back up on the wreck the stern castle is intact, even if the poop deck is beginning to fall down inside. There is a gun mount here, but no post or gun. Descending forward past the ladder on the port side to the intact main deck, you can see the uncovered hatches to both holds 3 & 4. The holds themselves are silted up (with the usual soft sticky stuff so beloved of western Lyme Bay). There is a winch still in between these rear holds. At the forward end of these rear holds there are some small hatches in the deck.
Travelling forward, the superstructure rises up. There are a number of cavities that allow you to see through the superstructure, but most seem too netted and tangled in fishing-line to allow a diver to swim through. On the starboard side of the superstructure, the hull plates are breaking away, allowing a good look into the ship.
Forward of the superstructure, on the port side (where the torpedo hit), the hull plates are collapsing and lie at and angle. Today they have sea-fans growing on them. On the starboard side forward of the bridge, the hull is also somewhat reduced, and on this side the collapsed mast leads out and down to the seabed. Travelling forward again, you ascend once more to the intact bow. The bow still has some of its wooden decking, and both bow anchors are in place.
Richard Wood – Nov 2001
Read Divernet’s article.
Skaala
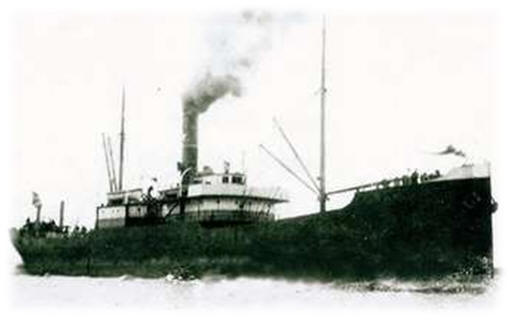
The Amicitia which is a similar ship to the Skaala and built by the same builder, Bergens Mekaniske Verksteder A/V (Image: Steve Clarkson)
The Skaala met her end from a German torpedo on December 26th 1917. One man perished in the attack. The Skaala was a Norwegian steamer that was carrying coal from Port Talbot to Rouen. She is 230 ft long and 35 ft wide.
The wreck can be found at 50:11:759 – 03:49:684 in 47m of water and is not far from the Maine. The wreck lies upright with a slight list to port. Her superstructure is collapsing around the engine room. Visibility is usually rather good although care must be taken of tides. There are lots of heavy coal briquettes in her holds.
The Skaala is a good deep dive. Her holds are open and there is little net on her. The sea bottom is clean and well swept. Her propellor is iron.
Skaala
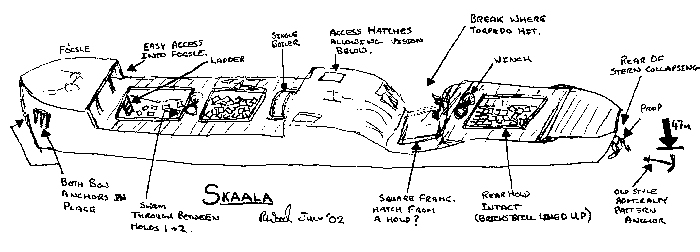
The Skaala (Image: Richard Wood)
The Skaala lies upright in one piece, with some list to port. She is about 5 metres proud of a coarse sand seabed at 47m (155ft). The coal bricks (a.k.a. “patent fuel”) are evident everywhere.
The counter-stern of the Skaala still has a propellor and rudder. On the seabed at this position is some collapsed wreckage and a small admiralty pattern anchor (?). There is no gun, she was unarmed. Moving forward are the rear hold(s?) – full of the square coal bricks. Moving towards the superstructure, you reach the torpedo hole on the starboard side. You can now swim up the bridge deck, which is collapsing into the hole, a hatch on the starboard side allowing a limited view below.
Immediately forward of the bridge deck, the boilers can be seen. There are two forward holds, equally full of coal bricks, which can be swam through. At the forward end of these holds, a ladder passes up to the bow. The enclosed deck here can also be swam through. Outside the bow, both anchors still hang in place.
Richard Wood – August 2001
Submerged report
Video: Diving the Skaala
More info about the Skaala
Glocliffe
The Glocliffe (Image: Richard Wood)
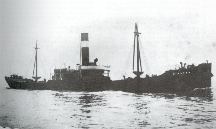
The Glocliffe was a 2200 ton steamer that was torpedoed in August 1917. She was carrying coal from Barry. The wreck lies off Torbay at 50 27.12; 003 17.38 (WGS84) and is a typical Lyme Bay wreck.
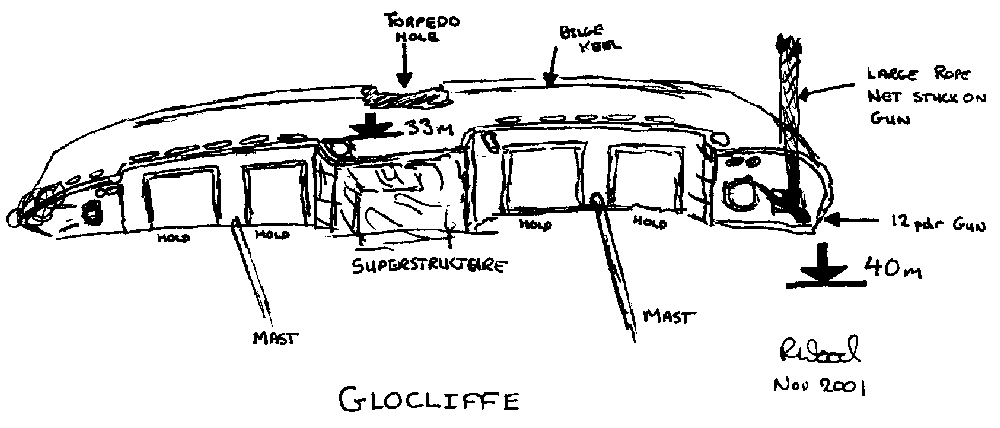
The Glocliffe lies on her port side on a silty seabed at 40 metres. The least depth to her starboard deck rails and bilge keel is about 33m. Because of her orientation care must be taken not to swim into the holds or superstructure without realising. As for many other Lyme Bay wrecks the viz. can be low, and there are copious amounts of net and fishing line present. She was sunk by UB-40 (Oberleutnant Howaldt – a winner of the Blue Max).
From the bow, the intact starboard rail of the foc’sle deck slopes up to about 33m. The foc’sle deck ends with a small step ‘down’ to the upper deck and 2 open holds, along the seabed can be found the winches and forward mast. The superstructure is intact and in place, not swept off like so many of the upright wrecks. The bridge and accommodation areas are easy to inspect.
Swimming over the side of the wreck (ie. the top) from the superstructure is not the dull thankless task you might think. The bilge keel is interrupted by a large hole into the engine and boiler rooms, courtesy of the torpedo that sank the ship.
Rear of the superstructure there are again two more holds, again with winches and mast projecting out on the seabed. At the rear of these holds there is a step “up” to the poop deck, complete with bollards and the 12pdr gun still on its post – but with a huge rope trawl net over it. This net stands several metres up from the gun with floats at the top, and covers the breech mechanism as though it were a fishnet stocking. Whoever said guns weren’t sexy?”
Richard Wood – November 2001
Read Divernet’s article
Rosehill
The Rosehill
The Rosehill is an increasingly popular wreck but without the right marks she isn’t easy to find. She was an armed merchant ship that was torpedoed by U40 in September 1917 whilst travelling from Cardiff to Plymouth. Despite the damage she limped on towards Plymouth before she expired some 2 miles south of Portwrinkle off the Cornish coast. The James Egan Layne is about 2 miles to the east.
She lies along a SE-NW axis on a reef with lots of large rocks around. Her bows lie SE and her stern NW. Depth is about 29m and her 2 boilers stand proud at around 24m. Marks are 50:19:40; 04:18:25. She was over 300 ft long and had a gross tonnage of nearly 3000 tons. Not a small ship.
As a dive the Rosehill resembles the Persier. Apart from the boilers she is well flattened and some of the wreckage is not easy to identify at first. You get the feeling that much lies underneath the steel plates that lie along the reef. The Rosehill abounds with fish – lots of them – poor cod, bass, pollack, wrasse, conger and many others. The fish seem quite curious and certainly unfazed by divers. To watch the shoals of fish swirling around the boilers is a splendid sight. There are some large conger on the wreck. The plates are covered with fan coral that wave gently in the currents that flow along the wreck. One dive plan is to descend down to the boilers and head SE along the plates until you get to the bows wherein you can easily see the anchor embedded into the plates plus part of a mast. Then head back NW past the boilers to the stern. The stern section is well defined. Here there is a gun that is quite impressive. The steering gear, rudder and part of her propellor are clearly seen.
Despite the fact that the wreck lies on a reef a fine sediment is easily stirred up which – if a herd of wildebeest divers have already preceded your dive – can lower the visibility dramatically. In any case visibility can often be quite poor on this wreck. Nonetheless, this is a very good dive.
Divernet article
Video: Pouting on the Rosehill
Medina
As the ‘glamour-girl’ of the Salcombe wrecks, the Medina was not the usual tramp steamer found plying the channel, but a 12,350 ton P & O liner, with construction so lavish that she had served her time as a royal yacht! She was on her way back from Sydney, Australia (via several other stops – with the Viceroy of India’s personal cargo aboard) when she lined herself up in the sights of Oberleutnant Bieber’s UB-31. Fitted with quadruple-expansion steam engines, the Medina was capable of 19 knots, and fitted with a 4.7 inch gun, she would have been more than a match for the UB-31 on the surface. U-boat attacks on liners are thus always stealth ambushes, and if the torpedo isn’t made to count, the liner will get away. In this case, the torpedo slammed into the rear of the engine room, disabling the big liner and sealing her fate. Fortunately, the Medina had put most of her passengers ashore in Plymouth, and in less than an hour she was abandoned. Six engine-room crew killed in the initial explosion were the only casualties.
She lies in 64m, 4 miles off Start Point at 50 12.25 : 03 32.11 (DMS). She is 550ft long and 63ft wide. Any diver who mistakes this huge liner for one of the tramp steamers sunk in the area is showing advanced signs of nitrogen-narcosis!
There have been attempts to salvage any valuable cargo from the Medina. Official salvages have not been very profitable, but rumours persist of unofficial successes.
There have been a number of diving incidents on this deep wreck.
The Medina (Image: Richard Wood)
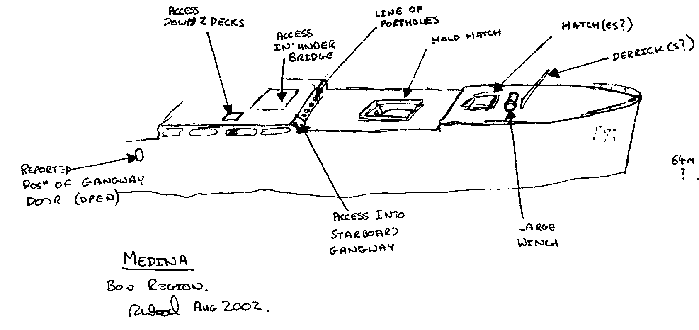
“The Medina lies upright and very proud of the seabed, with about a 10-15 degree list to port. The seabed here is 64 metres, so if the Medina had been a normal sized vessel she may well have been un-diveable on air. As it is you will land on the deck with 52m … er, sorry, I mean 50m of course – honest … showing on your dive-computer. Due to the depth it is very difficult to take in much of this immense wreck on any single dive, and so this description only covers the forward part of the wreck.
The highest part of this area of the Medina is the bridge. There is access inside the bridge here, and with the correct lighting (preferably divers torches on the outside) the glass windows along the front can be seen. Down each side of the bridge are the passengers covered walkways all very accessible. From the starboard (higher) side walkway there are hatches allowing access down into the wreck. Further back on the starboard side it is reported that there is an open boarding doorway.
Forward of the bridge, in the centre of a large area of deck, is the cargo-hold. Several decks are visible going down inside the wreck here (as are the lost crab-pots inside). Further forward, beyond a definite ridge there are winches, and derrick cranes are still standing proud. The bow of the Medina will come as something of a surprise, simply because of its size. Almost able to be mistaken as a ‘break’ because the curve is so slow and the angle about 90 degrees, the port anchor can be seen protruding out from the hull at the edge of your vision below you. At this stage your twenty minutes is likely to be up, and the forty minute trip to the surface must commence.
NOTE: Many divers rate the Medina as the best wreck dive in South Devon waters. Certainly, she is a major contender for this title, more is accessible than on the Empress of India (a battleship lying upside down in Lyme Bay’s silt). She is definitely, however, on the limits of air diving! Certainly most Medina dives will involve use of oxygen-rich decompression mixtures. ”
Richard Wood – May 2003
For more information, take a look at this report from the Maritima Archaeology Trust from 2018.
Totnes Castle
The Totnes Castle
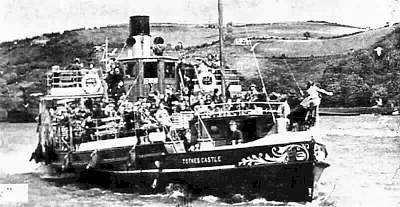
The Totnes Castle was a paddle steamer owned by the River Dart Steamboat Company that carried day-trippers from Dartmouth to Totnes. The 91 ton boat was built in 1923, was 108 ft long and took holidaymakers on trips up the Dart to Totnes and back until the end of the summer season of 1963. At the end of her working life she was converted into a restaurant but in 1964 as she was being towed from Dartmouth to Plymouth to be broken up, she broke her tow and sank in Bigbury Bay. She lay forgotten until 1994, when the survey vessel Gleaner found her. Her position is 50 15.375N: 003 58.841W and slack (springs) is HW + 2.45 to HW + 3.5
The wreck lies in 44m of water – and sits upright in a hollow on the shingle seabed, from which she is 3m proud. Her superstructure is missing, but her engine pistons can be clearly seen lying crosswise to the boat and in front of the single boiler. The steel hull and paddle wheels are still intact (although the paddle wheels are broken and levelled off), but the teak decking has gone, which allows easy access to all areas of the ship. The bows are in good condition and the forward hold can be easily entered. The stern is more broken up and in some places lies nearly parallel with the sea bed. There is a stern spar outside the wreck on the starboard side.
A great dive rather resembling the Elk with usually good visibility and plenty of fish life including some friendly congers and cod. The small size of the wreck means that divers have sufficient bottom time to swim around.
Video: Diving the Totnes Castle
Oregon
The Oregon was an 800 ton steel hulled sailing barque not unlike the Cutty Sark that is on show at Greenwich. She sank in 1890 after having struck a reef just offshore from Thurlestone. Despite the injury she put off to sea but she was leaking and was swamped by the high seas.
She lies in 34m of water on a dark gravelly bottom at 50 14.685 : 03 56.375. Her sides have collapsed and she is spread over the seabed with just 2-3m up at the bows and stern. Therefore, she is not an easy wreck to find since she doesn’t show up very well on the echo sounder. The wreckage is compact and it is easy to fin from the bows to the stern and back again without clocking up too much deco time.
There is lots to see on the Oregon since the wreckage is well laid out. At the bows is a large anchor and a short way behind it is a good example of an old style anchor winch. The forward hatch cover is uplifted on its side and along the collapsed starboard side are the remains of the Oregon’s masts. Amidships there is a cylindrical tank, a winch and plenty of plates. The stern has an impressive rudder half submerged in the seabed while the steering gear is still attached to the rudder post. The wreck has lots of pouting that swim all around you as you fin along the wreck. There are many sea fans on the rusty plates.
Read Divernet’s article
The Dartmouth Unidentified
The Greatham?
Not much is known about this ship, which is why she is termed the Unidentified. She is also known as the “Diver trainer” wreck because the navy has described it as “much swum over by sub aqua enthusiasts”. She is almost certainly a casualty of the German submarine attacks along the South Devon coast during WW1 and she could be the Greatham steamer that was sunk in January 1918 whilst travelling from Grimsby to Bordeaux with a cargo of coal. The Greatham was 290ft long with a beam of 38ft and a weight of 2338 tons which does fit with the wreck.
She lies in 47m of murky green water at 50 17.58 : 03 30.30 – just where the Dart river ends up depositing its sediments. There is a deep scour all around her since the wreck has sunk 7m down into the mud which is about 40m deep around her. Slack water is about 2 hrs before HW. She lies upright and in fairly good condition in a NNW – SSE direction. She is a typical 4 hold steamer with a well defined bridge section (covered with dead man’s fingers) that has a couple of swim throughs at around 38m. The holds are silted up. The stern section is fairly extant, but there is a distinct and impressive break just fore of the bridge that goes down to a dark 47m. Little is known about the bow section. Shell cases have been recovered from the stern in the past.
This is not a trivial dive. Apart from the depth, visibility is often not very good and the naval description of “much swum over” is probably an accurate description. This is not a wreck to penetrate, and finning down into the sheer scour is not for the faint hearted. A memorable and interesting wreck.
Read Divernet’s article on the Greatham
HMS Untiring
This was a “U” class Royal Navy submarine that was scuttled in 54m of water for use as a asdic training target in 1957. She was built in 1943 and saw some service with the Greek Navy. By 1953 she was obsolete.
The boat is easy to locate on the echo sounder owing to her size. She lies 8m upright in 54m of water on a shaley bottom – 50 12.46: 04 00.36 and is a superb dive. Most parts of this 200ft submarine can be easily explored. The bows are distinct with clearly seen torpedo tubes. The conning tower extends 8m from the bottom and the diver can just about stand in it and imagine the vessel heading out along the water. Obviously the narcosis helps!
Video: Diving the Untiring
Unicorn-Tile Wreck
This 134 ton rear engined steamer sank on 8th April 1923 by suddenly plunging into the water in heavy seas south of Rame Head. She was carrying a cargo of bricks and tiles from Plymouth to Jersey. She was 28m long and 6m wide, built in 1895 and had a 3 cylinder triple expansion engine.
She lies just over 50m deep at 50°16.937′: 04°15.529′ on a silty bottom. Stacks of red roof tiles lie inside the wreck. Single boiler, and engine are still there immediately forward of the stern. Hull quite broken, but part of stern listing to starboard and more intact. Propellor and rudder still present. An anchor near the bow, though the bow is not recognisable as it has broken and collapsed into the silt. Only the stern shows appreciably on a sounder. Some old net on her. Lot of congers and other life on the wreck. The stern stands up to 3m high.
Wreathier
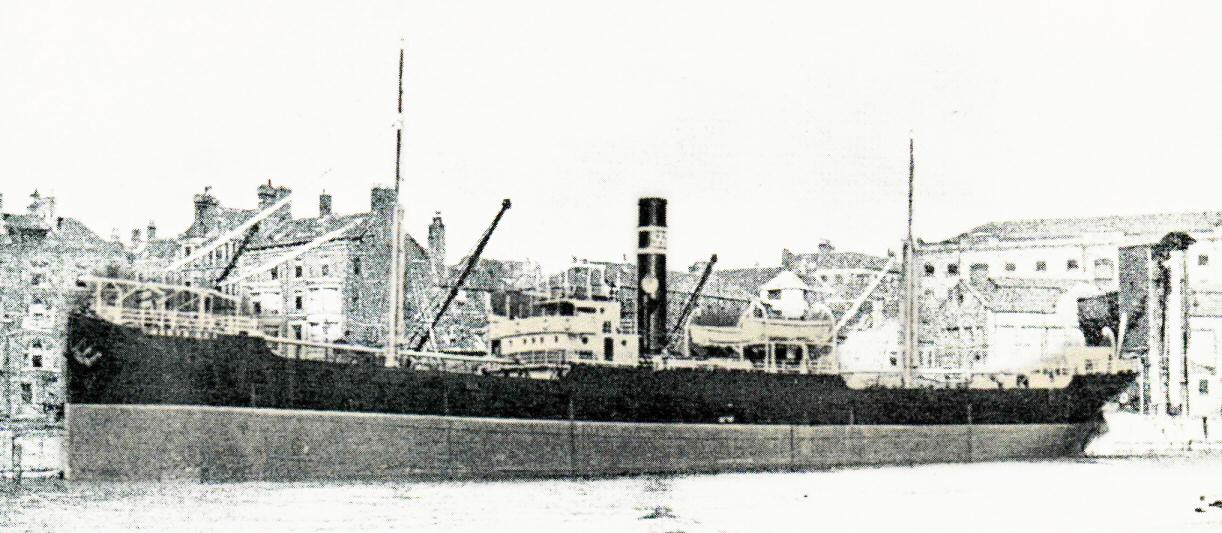
The Wreathier
The SS Wreathier was built in 1897 in Stockton, Teeside and was an 852 gross tonnage schooner rigged steamship owned by Allen Adams & Co. Ltd of Southampton. She was 61m long, with a beam of 9.4m and was defensively armed with a single 18pdr gun on the stern.
She was on route from Barry Dock in Wales to Rouen, with a cargo of 886t of coal when, on the 3rd December 1917, she was torpedoed by German submarine UB-35 (the same submarine sank the Skaala in almost the same location just 23 days later) and sunk about 1 mile West of Prawle Point. The torpedo hit on the starboard side in number three hold and the ship began to sink rapidly. The master came on deck with thoughts of trying to beach the ship, but decided to abandon ship when he realised that the after deck was already underwater (the torpedo hit at 4.15pm and the ship sank at 4.25pm, just 10 minutes later). 3 lives were lost in the attack, the chief engineer, Robert George, Eli Walker, a donkeyman, and Davey House, a gunner.
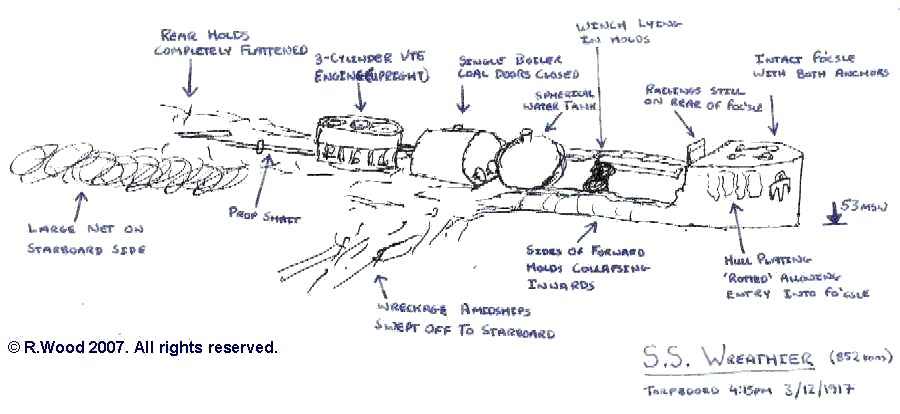
The Wreathier (Image: Richard Wood)
The wreck is in a general depth of 52m at 50 10.714N; 003 49.695W (WGS84). The forecastle is intact, upright and still has railings and anchors in place, standing some 6-8m proud of the seabed, but the hull behind this is starting to collapse in towards the holds. Immediately astern of the holds there is a large spherical water tank and then the large single boiler.
There is wreckage off to the starboard side here, possibly parts of the swept off superstructure. The triple expansion engine sits upright and intact behind the boiler, but from here to the stern the wreck is completely broken, presumably as a result of a combination of the explosion from the torpedo and the resulting stern first sinking. The prop shaft is clearly discernable in the wreckage and can easily be followed, although it is broken with an overlapping section partway along, and veers off to starboard just short of the stern, which is in 51m or so. The starboard side of the rear holds is completely entangled in a large net. There is reportedly a gun on its stern, although we didn’t see it. She was positively identified in 1984 when the bell was recovered. (Richard Wood, Allen Murray – 2007)
UB-35 sank a total of 43 ships during her career, with a gross tonnage of 49,002t. She served in the U-Flottille Flandern from July 1917, having transfered from the U-Flottille Kurland. On this patrol, she had freed herself from nets in the Dover straights and had an encounter with the Q-ship Carrigan Head. She continued and sank 7 ships for 6870t, all in the Salcombe area. She had also taken on board survivors from the Brixham trawler Rion, who were present when she torpedoed Wreathier. These men were well treated and released later. Unfortunately, this gallantry did not save her English speaking captain or his crew, as the boat was sunk by HMS Leven on 26th January 1918 whilst attempting to run the Dover Barrage.
The Charlwood
The Charlwood was an iron sailing barque built at Sunderland by William Doxford and Sons in 1877. She was 60m long and 10m wide and weighed in at around 850 tons. The boat was en route from Antwerp to Valparaiso when she collided SW of the Eddystone with the British steamer Boston (going from Cardiff to London) on 26th October 1891 at 4:45am. The Charlwood foundered almost immediately after the collision with a loss of 16 lives – only an apprentice and the Captain’s daughter were saved. The vessel was carrying glass cargo and the wreck is packed to the brim with a variety of Victorian tumblers, wine glasses, decanters, plates, cups, bottles and sheet glass.
The Charlwood lies 5m upright on a 63m seabed at 50 11.431N; 04 22.106W. Much of the wreck stands well clear although towards the stern the wreck has collapsed. The bow seems squared off as if it has broken and collapsed foreward of the first bulkhead. In this collapsed area can be seen the base of the bowsprit. On the Starboard side forward of the main collapsed area are a number of barrels. The stern area is much flatter although there appears to be a rudder laying on its starboard side under other debris.
In some ways the Charlwood resembles the Elk but with the holds crammed with glass. Some divers think it looks like a council skip full of “Victorian petrol station quality glass”. The wreck abounds in fish – lots of wrasse and a conger or two. Visibility is often very good on this wreck.
The Rame Head Barge
Rame Head Barge – The Leen?
The barge may be the Leen that sank 22nd Nov 1905 en route from Rotterdam to Briton Ferry. There was a Force 9 WxS blowing that night. If the Leen, then she is about 150 tons.
The barge lies upright in about 33m and stands up to 2m proud and is in a good state of preservation. 50º 18.368N – 04º14.765W (D M.MM, WGS84). The wreck is about 7m wide, maybe 25m long. It is constructed mainly around a large rectangular cargo hold, the fore and aft bulkheads of which form enclosed areas at the bow and stern. There is a hatch down into this forward space. There must have been hatch covers on the barge since there’s a central rod that runs the length of the barge with gearing on at least one end. There is a hole in the rear bulkhead of the above forward space, giving a view into and through to the open sea via a large gap in the starboard side. There’s the remains of what looks to have been a water tank near one of the bulkheads. Rivets have been used in constructing the barge.
Lots of life on the wreck including some large schooling bib and at least 3 congers. There are a lot of large plumose anemones along the central rod and cross members. Also large colonies of the Oaten pipes hydroid – Tubularia indivisa (long stalky creatures with single polyps on the ends) and pink seafans, some with egg masses of the seafan nudibranch attached.
The area around the barge has been used extensively for dumping. Finds have included silver forks and spoons, glassware and clay pipes. The area also has large amounts of explosives and ammunition dumped both individually and in boxes.
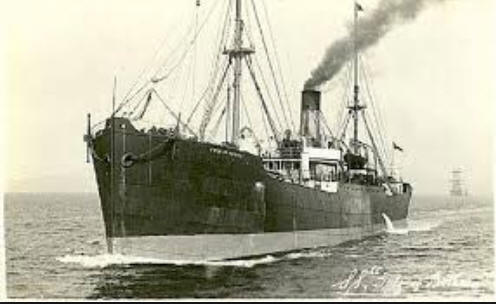
A similar ship to the Ambassador
The Ambassador
was a steel screw steamship of 2,572 tons, length 300 ft., breadth 39 ft. and hold depth 24 ft. She was built at Willington Quay by the Tyne Iron Shipbuilding Company in 1888. She was schooner-rigged, and fitted with three vertical inverted triple-expansion engines of 220 hp combined.
The Ambassador left Odessa, bound for Hamburg, on the 3rd September 1891, with a cargo of 3050 tons of grain, 350 tons of bone dust and a crew of 27 hands, including the master, Mr. James Aikman. She foundered on 19th Sept 1891 off Bolt Head as a result of striking some sunken wreckage or waterlogged vessel at 3am. The crew tried to get back to Plymouth by reversing the boat around but the aft bulkheads were filling with water and by 5am the engines failed. All hands then left the boat and watched as she sunk some 3 miles south of Bolt Head. They then set a course for Salcombe where everyone landed.
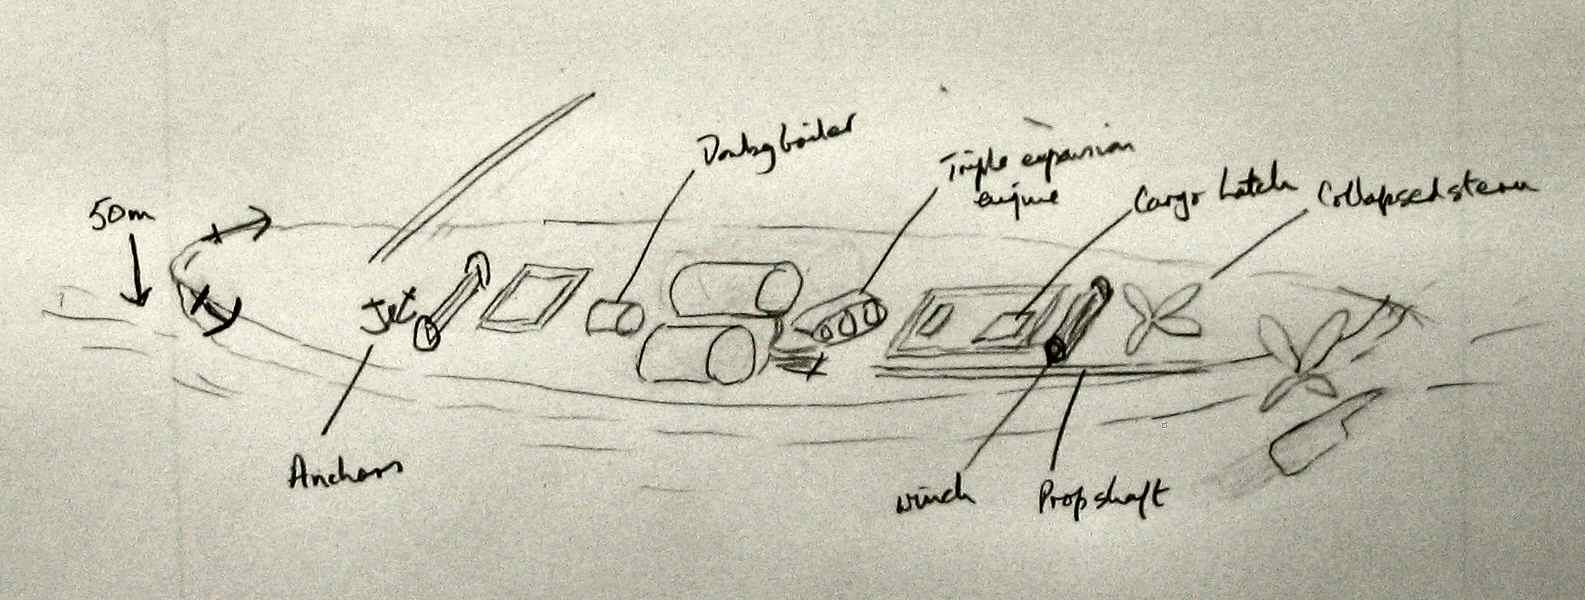
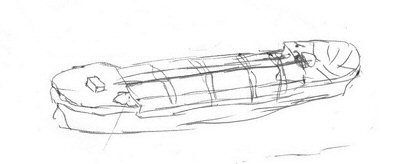
Sketch of the Ambassador wreckage
The wreck is about 100m long in 50m on a light sandy bottom lying E-W with the bows to the west 50:11:529 N – 03:49:782 W. A small donkey boiler sits amidships forward of the two main boilers. Well preserved triple expansion engine which has collapsed to starboard . Spare prop on deck with a superb prop standing upright at the end of the prop shaft. The collapsed stern is on its starboard side and the small rudder is detached from the hull and lying on the seabed a few meters from the prop. Small prop shaft with no apparent shaft tunnel which disappears under wreckage shortly before the stern. Winches and hatch covers with a number of raised cargo hatches. A large foremast lays across the wreck off to starboard. The bow seems to be upright but is very collapsed and so it is difficult to be sure, there are two large anchors in their hawspipes here as well as a number of anchors within the wreckage which may have been spares. The decks are collapsed so a bit like the Rosehill in that respect. But much lighter than the Rosehill (or the nearby Skaala) – MR, RK – 2008.

